(Last Updated On: February 24, 2018)
On any Windows system, you can open images by its system-provided application while you need to install a third-party application or plug-in to open PDFs. What’s more, compared to image, PDF is often larger and takes more spaces because it contains various elements like text, charts, tables, graphics, and hyperlinks. As you can see, image is much easier shared for its small size and extensive cross-platform compatibility. Therefore, this is where a free PDF to image converter software program comes in handy.
Surely there are countless PDF to image converters for you. However, only a few of them provide the high-quality image with good resolution and most of them have embedded ads or unwanted bundled software. Unlike them, All PDF Converter Pro is able to turn PDF file into popular image formats with zero-defect and is 100% clean with no adware and crapware. Let’s explore how to use this free software to convert PDF to Image together.
How to Convert PDF to Image with All PDF Converter Pro.
Step 1. Install All PDF Converter Pro.
Download All PDF Converter Pro and run the installer to install it.

Step 2. Import PDF into Converter.
Run the program by double-clicking on the quick-start icon.
Then, a minimalist and intuitive interface shows up.
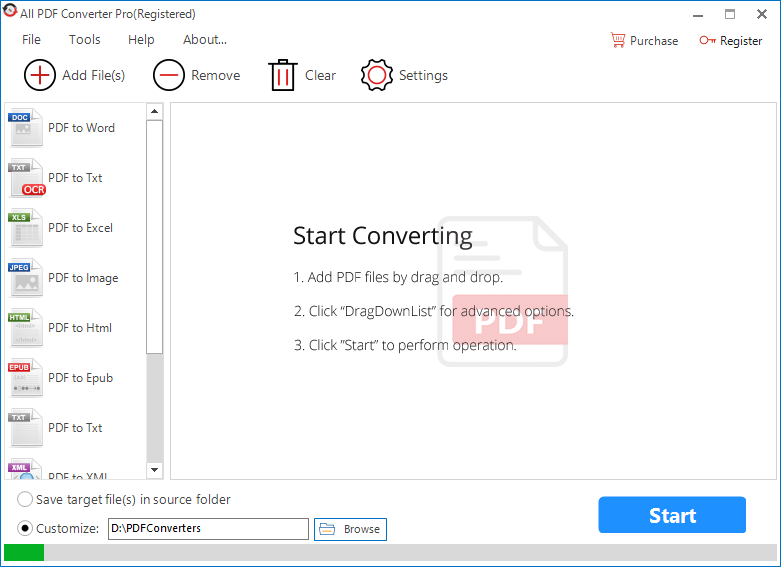
You can import PDF into the program by two methods.
Method 1. Click on “Add files” to locate what you want to convert and click on “Open” to add it to the program.
![]()
Tip: You are allowed to add more than one file.
Method 2. Drag and drop PDF files onto the blank area.
Tip: You are allowed to drag and drop multiple files.
Step 3. Configure Settings.
Select “PDF to Image” on the left side panel as output format.

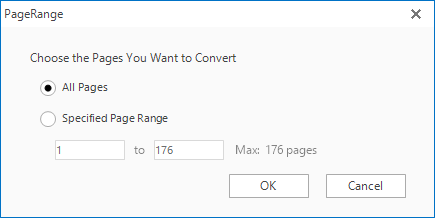
Right-click on the added PDF and a context menu shows up.

Click on “PageRange” in the menu to determine the page range.
You are allowed to convert all pages by selecting “All pages” or convert some of them by selecting “Specified Page Range” and entering the page number.
Don’t forget to have the setting applied by clicking on the “OK” button.
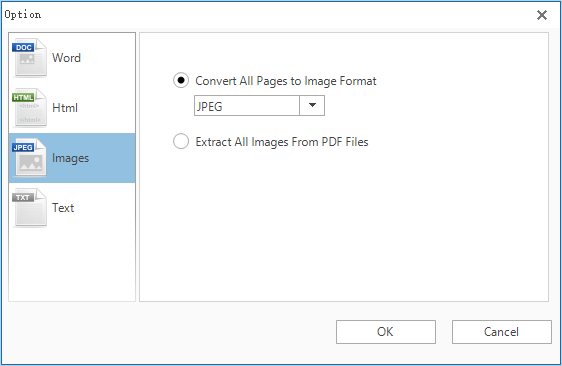
Click on “Settings” to choose the conversion option as you need.

Choose “Images” at the left side panel.
![]()
To convert each page to a single image file, select “Convert All Pages to Image Format”.
Customize the output file extension in the drop-down menu.
To extract all images and export each of them to an individual item, select “Extract All Images from PDF Files”.
Each output image is in JPG extension.
Apply the setting by clicking on “OK”.
To set output directory, you can select “Same as Resource” to find the output file where the source file is or specify a new output location through path bar or browse dialog.

Step 4. Start Conversion.
After all settings are settled, click on “Start” to start converting PDF to image.

It will be finished in a moment and you will be notified by a prompt dialog “Progress has finished”.

The four steps above are everything you need to know for the tutorial. All PDF Converter Pro aims at letting you turn PDF into JPEG, PNG, TIFF and EMFF precisely with just a few clicks. This free PDF to image converter software also can help you to convert PDF to Word in a perfect way.